
Have you ever been on a website where' you upload an image, video, or music file and are immediately taken to another page to view it? This feature, which might seem complex, is surprisingly simple to implement on the Wapkiz and Wapaxo platforms.
In this step-by-step guide, we will show you exactly how to create a two-page system: one for the user to upload a file and another that automatically displays it after the upload is complete. Let's get started!
Step 1: The Setup - Creating the Two Pages
The logic of our system relies on two separate pages working together. Therefore, the first step is to create them.
- Go to your admin panel in Wapkiz/Wapaxo.
- Create a new page and give it a suggestive name like "Upload File" or simply "Upload". This will be the page with the upload form.
- Create a second page and name it "View File" or "Viewer". This is the page where' the user will be sent after a successful upload.
With both pages ready, we can start setting up the magic.
Step 2: Configuring the Upload Page
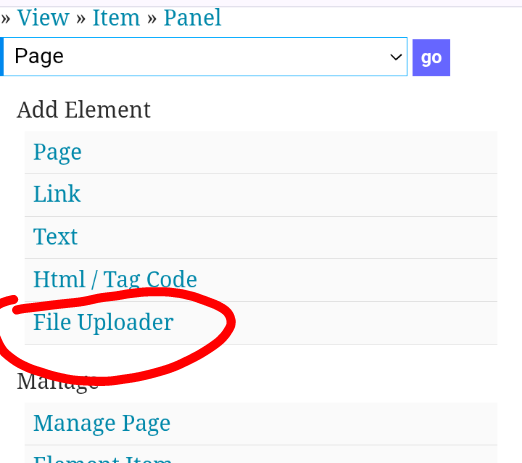
Now, let's focus on our "Upload File" page. This is where' we'll add the form that allows users to submit their files.
- Navigate to the upload page you just created.
- In the editing panel, look for the "Add Elements" section.
- Click on the "File Uploader" link.
You will be taken to a configuration page with several fields. Let's break down each one.
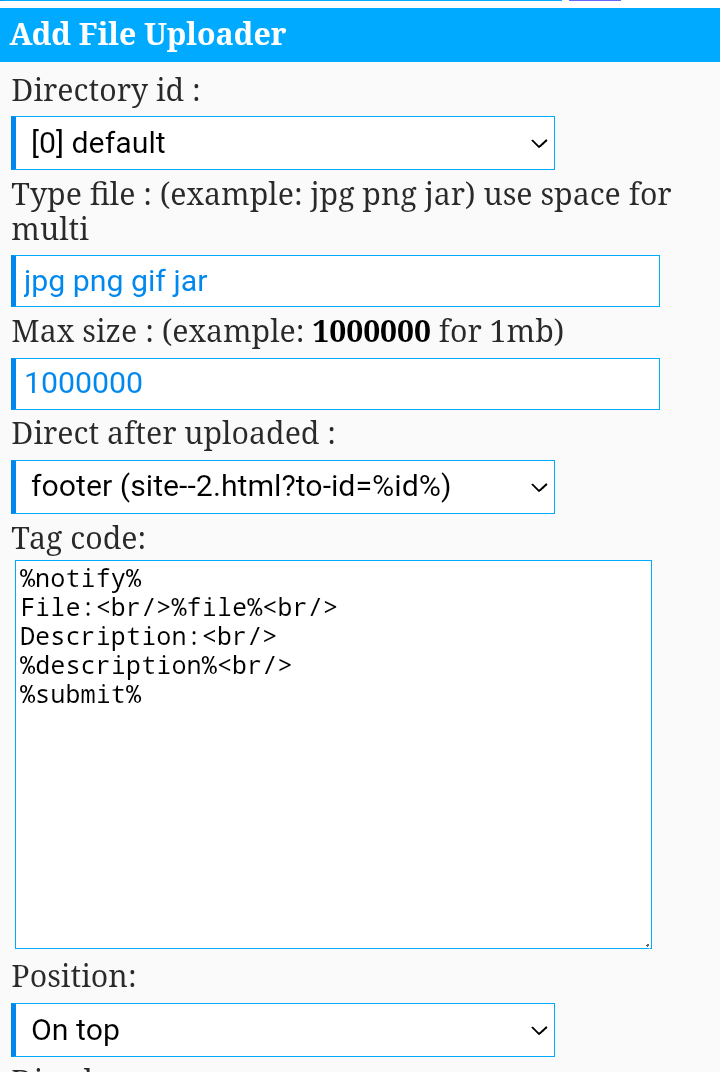
Understanding the Upload Form
- Directory Id: Select the folder (directory) where' the files will be saved after being uploaded. It's important to keep your files organized.
- Type File: Enter the allowed file formats. To accept multiple types, separate them with a space.
- Example for images: jpg jpeg gif png ico
- Example for audio and video: mp3 m4a wav 3gp mp4 avi
- Example for various types: jpg png mp3 mp4 avi apk zip rar
- Max Size: Set the maximum file size in bytes. Remember the conversion: 1,000,000 bytes = 1 MB. If you want a 5 MB limit, you would enter 5000000.
- Direct after uploaded: This is a crucial step! From the dropdown menu, select the viewer page we created in Step 1 (e.g., "View File"). This ensures the user is automatically redirected.
- Tag code: This field controls the appearance and elements of your form. You can use HTML for styling and the following special codes (tags):
- %notify%: Essential! Do not remove this tag. It displays error messages (e.g., "invalid format," "file too large") or success notifications.
- %file%: Essential! This shows the "Choose File" button for the user to select a file from their device.
- %description%: (Optional) Adds a text box for the user to enter a description for the file.
- %*var-variable%: (Advanced) Allows you to add extra form fields to collect more information.
- %submit%: Shows the button to submit the form. You can easily customize it. For example, to make the button say "Upload Now," use %submit=Upload_Now%.
After you've configured everything to your liking, click Save. Your file upload page is now ready!
Important Notes:
- This method does not support multiple file uploads at the same time (only one by one).
- By default, the upload form is only visible to logged-in users and administrators.
Step 3: Bringing the Viewer Page to Life
Now that the upload is configured, let's go to the "View File" page to display the content that was just uploaded.
- Navigate to the viewer page you created.
- Add the following File Manager (FM) code:
[fm]to=:to-id:|| <div class="file-view"> <h3>%name%</h3> <p>Here is your file:</p> %*thumb% <p><strong>Description:</strong> %description%</p> </div> [/fm]
Understanding the FM Code
- to=:to-id:: This is the most important parameter. It tells the File Manager to find and display the information of the file that was just uploaded and redirected the user to this page. It's the glue that connects the two pages.
- %*thumb%: Shows a thumbnail of the file. For images, it will be a 100x100px version. For other file types, it will display a corresponding icon.
- %name%: Displays the original name of the file.
- %description%: Shows the description that the user entered in the form (if you added the %description% tag on the upload page).
There are many other tags you can use inside the [fm]...[/fm] block to show the file size, date, download link, and more. Feel free to customize the layout with HTML and CSS to make it look exactly how you envision it!
Conclusion
And there you have it! With just a few steps, you have created a functional file upload and viewer system on your Wapkiz or Wapaxo site. Now your users can upload content intuitively and see it immediately.
Try experimenting with the codes, adding different styles, and exploring other File Manager tags to make the experience even richer.
If you have any questions or suggestions, feel free to leave a comment below.


.jpg)

7 Comments
Nc tutorial boss
Thanks Admin
Hello I want to make users personal file uploader on there profile page. (Like photo albums, users photos, users video etc..) on users profile page. Can you create code for me?
Hi, Nilesh, I can, contact me on WhatsApp +258 86 968 2318
Post to valoi hoice bro
4oagag
Am Very Good In coding But The Site Looks Complecated Please Do Something So I Can Code My First Chating Site,
Leave a Reply