For any website, content organization is crucial. Besides the default homepage (index), which acts as the front door, it's essential to create other pages for different sections, such as music, videos, contact, or site information.
Today, in this tutorial, we will cover the simple and fast process of creating a new page on the Wapkiz and Wapaxo platforms, which share a very similar interface.
Prerequisites:
- You must have an account on Wapkiz or Wapaxo.
- You must be logged into your administration panel (Admin Panel).
Method 1: Using the "Add Element" Option
This is the most common method and gives you full control over your page creation process.
Step 1: Access the Page Manager
After logging in, go to your site's administration panel. You will typically land on your main page view (index). This is where'' we'll start.
Step 2: Add a New Element
In the panel, look for the section or button labeled "Add Element". This option allows you to add all kinds of content to your site.

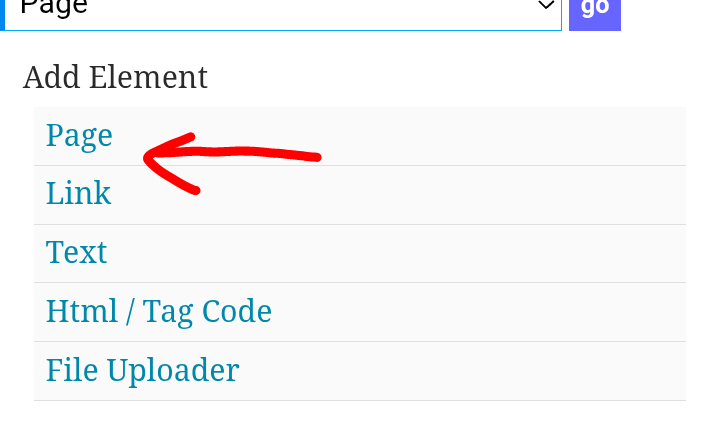
Step 3: Select the "Page" Element
When you click on "Add Element," a list of various element types will appear (text, image, HTML code, etc.). From this list, find and click on the "Page" option.
Step 4: Configure Your New Page
You will now be taken to a page creation form. Here, you need to fill in the main field:
- Page Name: Enter the name you want to give your page here. This name will be used to generate the permanent link (URL).
- Example: If you enter music, the page link will be something like page-music.html.
- Tip: Use short, descriptive names and avoid spaces or special characters (use hyphens - if necessary).
After entering the name, click the button to create the page (usually "Create" or "Add").

Method 2: The Quick Way (Using the Page Selector)
This is an even faster way to start creating a new page, ideal for when you're already working in the panel.
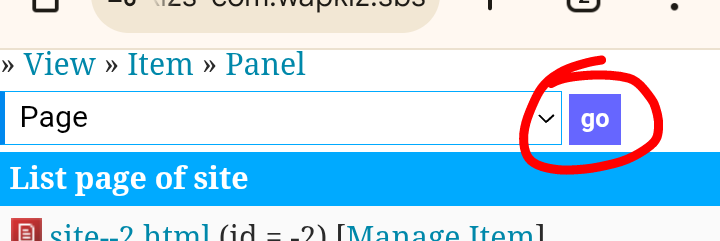
Step 1: Locate the Page Selector
At the top of your page manager (where'' you see the current page's name, like index), there is a dropdown menu that lists all the existing pages on your site.
Step 2: Create the New Page
Click on that menu. In addition to the list of your pages, you will find an option like "[ Create New Page ]" or "[ Add New Page ]". Click on it.
Step 3: Set the Name
Upon clicking, you will be redirected to the same page creation form as in Method 1. Just enter the desired name and confirm.
What's Next? Adding Content to Your New Page
Congratulations, your page is created! But for now, it's empty.
After creation, the system will automatically redirect you to your new page. Now you can start adding content to it using the same "Add Element" button, but this time to insert :
- Text and titles.
- Images.
- Download links.
- Videos.
- Custom HTML/CSS code.
Simply repeat the "Add Element" process for each item you wish to add, building your page step by step.
Conclusion
Creating new pages in Wapkiz and Wapaxo is a fundamental process for organizing your site and offering a better experience to your visitors. Whether you use the standard method or the quick shortcut, in just a few seconds, you'll have a new section ready for content.
Now that you've mastered this technique, you can start structuring your site more professionally, creating an "About Us" page, a photo gallery, a downloads section, or whatever else your imagination allows.

, which acts as the front door, it's essential to create other pages for different sections, such as)
1 Comments
Good tutorial boss
Leave a Reply