
The Wapkiz and Wapaxo platforms offer a powerful and native tool to increase interaction and reward user activity: the point (or credit) system. With it, you can transform your site into a more dynamic community where''' users are encouraged to actively participate.
This comprehensive guide will show you step-by-step how to set up, manage, and use this system to create exclusive content, implement a referral system, and reward your most loyal members.
What is the Point System and How Does It Work?
The point system allows users on your site to automatically earn credits by performing specific tasks. You can define a score for actions such as:
- Registering on the site.
- Logging in daily.
- Creating a post in the forum or blog.
- Uploading a file.
- Referring new users through a personal referral link.
After earning points, the total can be publicly displayed on the user's profile or in other parts of the site using the platform-specific tag: :*profile(username)-point:.
1. How to Set Up the Automatic Scoring System
The initial setup is simple and done directly from the control panel. Follow these steps:
- Access your Admin Panel.
- In the menu, navigate to the "User settings" section.
- Click on the "Credit Point" link.
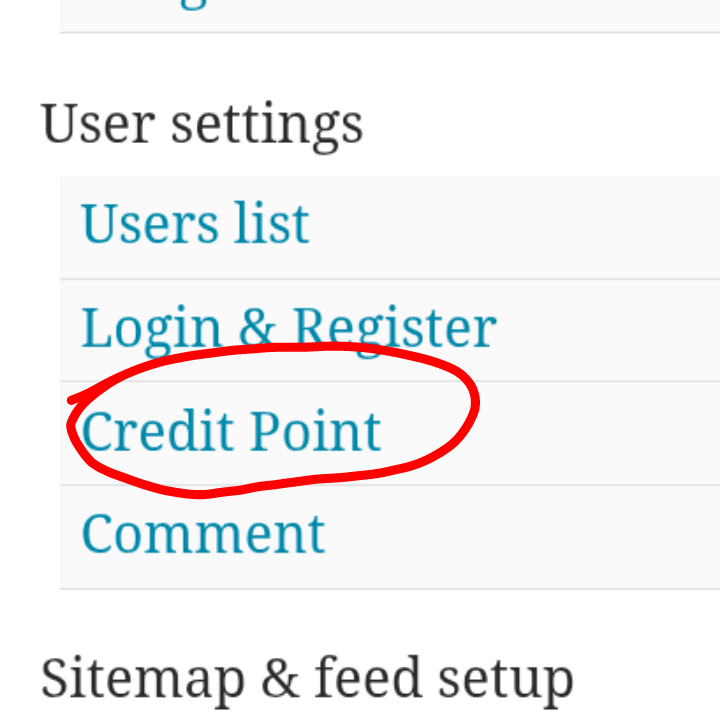
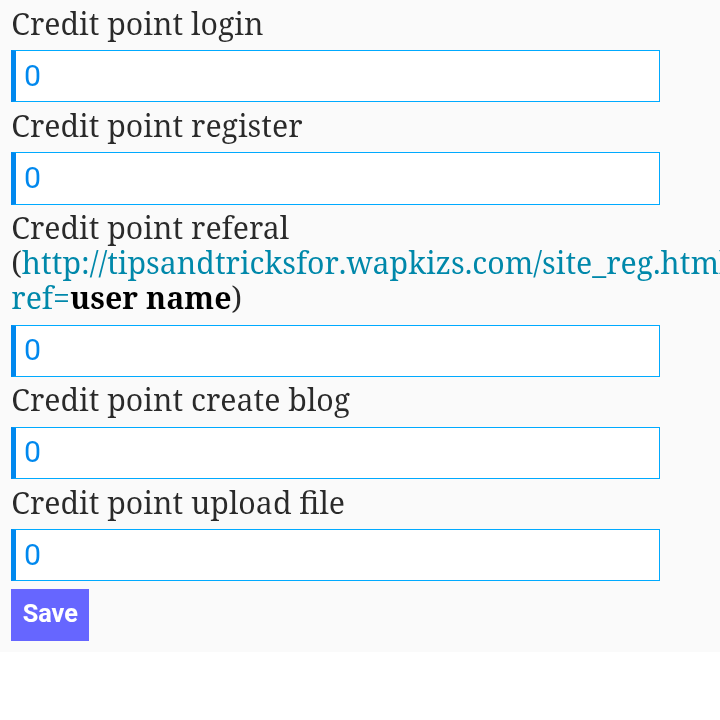
- On the next page, you will find a list of actions (Login, Register, Post, Refer, etc.). Fill in the fields with the point value you want to assign to each task. For example:
- Register: 10 points
- Login: 2 points
- Upload file: 5 points
- Refer: 15 points (for the referrer)
- Click "Save" to apply the changes.
From now on, whenever a user performs one of these actions, the points will be automatically credited to their account.
1.1. Setting Up the Referral Link
For the referral point system to work, you need to provide your users with a unique referral link. It is through this link that the platform will know who referred the new member.
The structure of the referral link is:
https://yoursite.wapkiz.mobi/site_reg.html?usernameTo make this link dynamic, you should place it on a page accessible to logged-in users (like their profile or a menu) and use the %name% tag. The platform will automatically replace %name% with the username of the person viewing the page.
Practical code example to insert on your site:
Share your referral link and earn points for every friend who registers!
https://wapstrong.xyz/site_reg.html?username
How it works: When a logged-in user named "John123" views this page, the link for him will be /site_reg.html?John123. If he shares this link and a new visitor registers through it, "John123" will automatically receive the points you defined for "Refer".
2. How to Manually Add Points to a User
In addition to the automatic system, you can add or remove points from a specific user individually. This is useful for rewarding a member for exceptional behavior or for correcting a score.
- In the Admin Panel, go to "User settings" again and click on "Users list".

- Find the user you want to modify in the list and click the "add point" link next to their username.
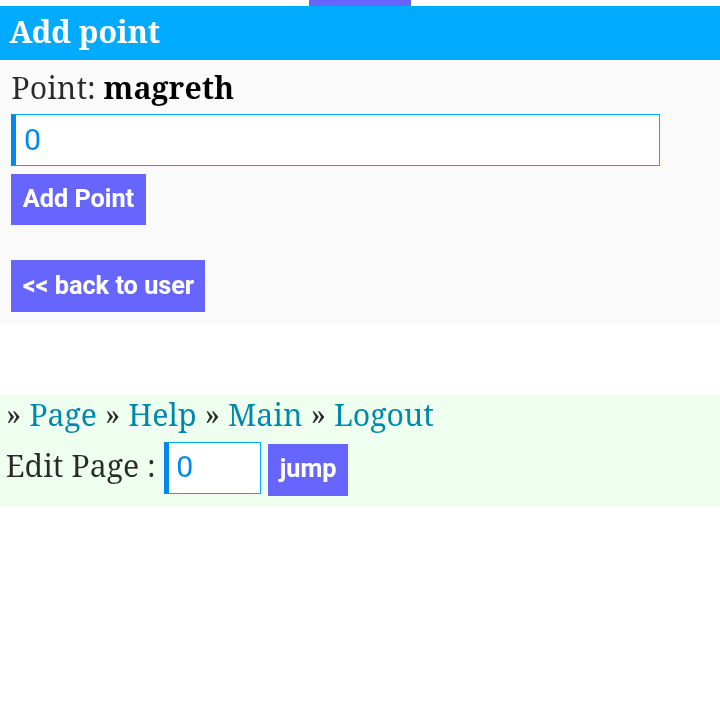
- On the next page, enter the number of points you want to give (use a positive number to add and a negative number, like -10, to remove).
- Click "Save". The points will be instantly added to or subtracted from the user's account.
[Image: Field to enter the number of points and the save button.]
3. Practical Applications: What Are the Points For?
Points are more than just a number. They can be used strategically to enhance the experience on your site.
a) Gamification and Recognition
The most immediate use is to show how participative and relevant a user is in the community. Displaying points on their profile creates a "gamification" system, where'''''' members can compete in a friendly way to see who is most active, encouraging continuous participation.
b) Access Control and Exclusive Content
This is the most powerful application. You can restrict access to certain pages, download files, or features only to users who have reached a certain number of points. This creates a sense of exclusivity and rewards the most dedicated members.
To do this, we use the Wapkiz/Wapaxo conditional IF tag.
Example 1: Block content for users with few points
Let's say you want a download link to appear only for users with 7 or more points. For those with fewer than 7 points, you can show a warning message.
The code would look like this:
(*if rofile*(%name%)-point:<7)
      You need at least 7 points to view this content. Participate more on the site to earn points!
      (/if)
rofile*(%name%)-point:<7)
You need at least 7 points to view this content. Participate more on the site to earn points!
(/if)
(*if rofile*(%name%)-point:<7)
      Your content here
      (/if)
Example 2: Show content only to high-point users
If you don't want to show an alter------native message, you can simply display the content only to those who meet the requirement.
Important Note on User Tags:
The word (username) in the code must be replaced with the correct variable, depending on the context:
- Use %name% when the check is about the user who is viewing the page (e.g., in the site header, on a profile page).
- Use %*by% when the check is about the author of the content (e.g., within a blog post, forum thread, or in a file description).
Conclusion
The point system on Wapkiz and Wapaxo is a fantastic and easy-to-implement tool for building a stronger and more engaged online community. By rewarding activity, implementing a referral system, and creating exclusive content, you not only value your most loyal users but also encourage new members to participate actively from the start. Start using this feature today and see the difference in your site's dynamics.

0 Comments
Leave a Reply